
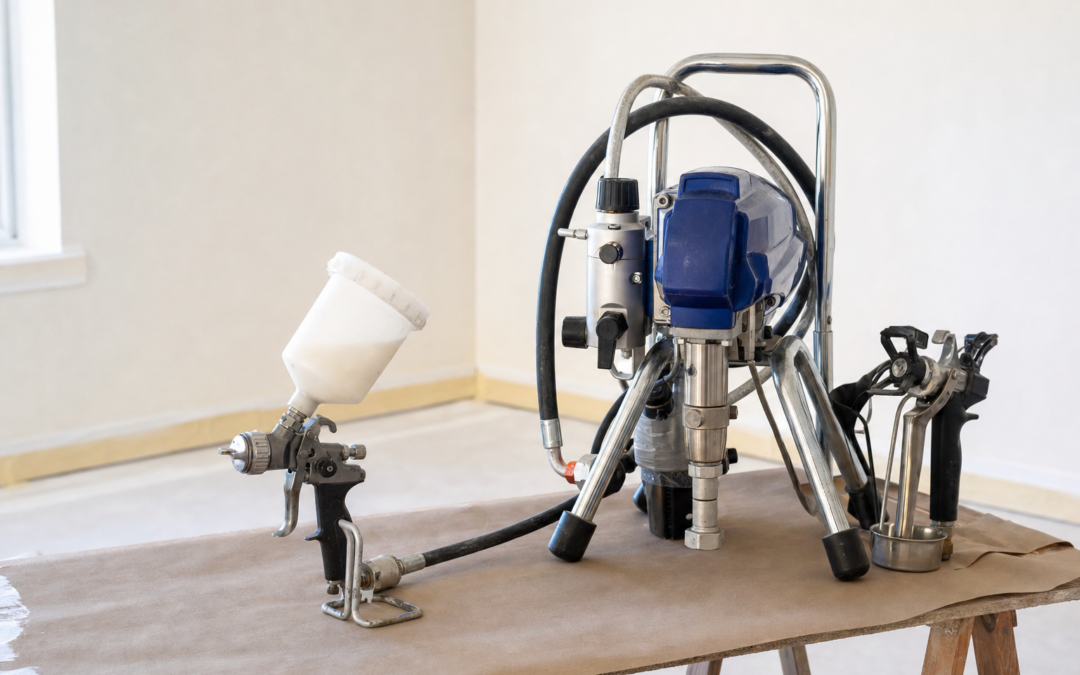
A paint sprayer can finish a room, fence, or cabinet set in a fraction of roller time—if you choose the right type and respect overspray. This 2026 guide compares HVLP handheld sprayers and airless units for home DIY, so you know when spraying beats rolling and when it creates more cleanup than it saves.
Browse related gear from our Painting & Wall Prep hub. Here we focus on sprayer selection, thinning, technique, and honest limits.
What Home DIYers Actually Need a Sprayer For
Sprayers shine on:
- Interior walls and ceilings in empty rooms
- Exterior siding and fences with proper masking
- Cabinets, furniture, and doors where brush marks annoy you
- Shutters, spindles, and detailed trim that eats brush time
Sprayers struggle when you cannot control overspray, cannot empty a room, or are only touching up a single wall. A quality roller still wins for occupied rooms and small patches.
Buy for the job you do most, not for the dream barn renovation. Handheld HVLP suits furniture and light interior work. Airless units suit big walls and exteriors when you will use them more than once a year.
HVLP vs Airless: Clear Tradeoffs
HVLP (high volume, low pressure) atomizes paint gently. Less bounce-back, better for detail and indoor pieces, slower on huge wall fields. Many handheld units plug into a household outlet and use cups or small hoppers. You often thin paint slightly and practice spray patterns on cardboard.
Airless pumps paint at high pressure through a tip. It covers walls and exteriors fast and handles thicker coatings with less thinning. Overspray is real. You need tip knowledge, pressure control, and serious masking. Cleanup is more involved, but so is the time savings on large square footage.
Neither replaces surface prep. Sprayers highlight defects as efficiently as they hide brush strokes.

Wagner Spraytech FLEXiO 595 Handheld HVLP Paint and Stain Sprayer — The Wagner FLEXiO 595 handheld HVLP is a practical DIY step-up for furniture, doors, and lighter interior spraying without committing to a full airless rig. Expect a learning curve on tip settings and thinning.

Graco Magnum X5 Airless Paint Sprayer, Interior & Exterior — The Graco Magnum X5 airless sprayer is built for homeowners tackling interior/exterior volume—walls, fences, and siding—when roller days feel endless. Budget time for masking and thorough cleanup.
Overspray, Masking, and Neighbor Diplomacy
Overspray travels farther than beginners expect. Indoors, plastic off entire rooms, cover floors edge-to-edge, and mask trim you are not painting. Outdoors, watch wind. A gentle breeze turns your fence project into the neighbor’s car project.
Use painter’s plastic and canvas together: plastic for dust and mist, canvas where you walk. Remove or bag light fixtures. Cover HVAC returns so mist does not circulate.
If you cannot isolate the space, do not spray. Roll. The fastest finish is still the one that does not require cleaning paint off hardwood and window glass.
Thinning, Tips, and Practice Patterns
Follow the sprayer and paint manufacturer guidance. Many latex paints need a bit of water or conditioner for HVLP. Airless tips are sized by orifice and fan width—wrong tip means tails, spitting, or flooding.
Practice on cardboard or scrap drywall:
- Keep the gun perpendicular to the surface
- Start moving before you pull the trigger; release before you stop
- Overlap passes about 50%
- Maintain consistent distance—usually 6–12 inches depending on tool
Spits and holidays (missed spots) come from hesitation and arcing your wrist. Smooth arm motion beats twitching the trigger.
When Rollers Still Win
Rollers remain best for:
- Occupied rooms with furniture that cannot leave
- Touch-ups and single-wall accent projects
- Heavily textured surfaces where spray burns through material
- Beginners painting one bedroom this year and nothing else
A sprayer is a productivity tool, not a personality upgrade. If your annual painting is one bathroom, a good roller frame, cover, and brush kit costs less and cleans in minutes.
Cleanup Reality Check
Factor cleanup into project time. HVLP cups and needles need thorough washing. Airless systems need pump flushing with the right solvent or water until clear. Neglect turns dried latex into a maintenance nightmare.
Set up a cleanup station before you start spraying: buckets, brushes for tips, and a place to run flush water outdoors legally. Never dump paint-laden water into storm drains.
Indoor Walls: A Practical Workflow
- Complete full wall prep and priming as needed
- Empty the room; mask windows, trim, floors, and fixtures
- Turn off HVAC or cover returns
- Spray ceilings first if they are in scope, then walls
- Back-roll lightly if you want roller texture consistency
- Keep a wet edge; work in sections
- Flush the sprayer immediately after the final coat
Back-rolling means rolling over freshly sprayed paint to even texture. Many pros do it on walls so the finish matches repaired areas later touched up with a roller.
Cabinets and Furniture: Where HVLP Shines
Cabinet doors sprayed horizontally get smoother films than brushed faces. Sand between coats with fine grit, vacuum dust, and keep the spray space clean. Use finishes designed for cabinets when you need durability—wall paint on doors scuffs quickly.
Remove doors and hardware. Label hinge locations. Spray the backs first, then fronts, so the show faces get the cleanest last coats.
Exteriors and Fences
Airless systems earn their keep on fences and clapboard. Work cooler parts of the day, avoid direct hot sun that skins paint before it levels, and watch wind. Keep a brush handy for drips on edges.
Prep still dominates: scrape failed paint, sand glossy enamel, prime bare wood. Spraying over peeling paint just makes prettier peels.
Safety Basics
Wear a respirator rated for paint mist, eye protection, and clothing you can ruin. Airless tips can inject paint under skin—never put your hand in front of the tip, and use tip guards. Unplug or depressurize before clearing clogs according to the manual.
Ventilate. Solvent-based coatings need extra caution. Keep kids and pets out until films are dry and mist has settled.
Budget Tiers Without the Hype
Entry: Handheld HVLP for furniture and small projects. Lower coverage rate, higher control.
Mid homeowner airless: Units like a Magnum-class sprayer for whole-house interiors/exteriors you will actually finish.
Pro rental: For a one-time barn or full exterior, renting a larger airless can beat buying. Factor tip purchase and learning time.
Spend money on tips, masking materials, and proper respirators—not only on the sprayer body.
Common Sprayer Mistakes
Spraying without practice passes. Skipping mask on “just one corner.” Holding the gun too close and creating runs. Thinning randomly without measuring. Letting paint dry inside the pump. Trying to spray in a furnished room. Expecting sprayers to hide poor prep.
Each mistake is fixable. Most are cheaper to avoid than to repair.
Choosing Between the Two Reviewed Paths
Choose HVLP handheld if your year looks like furniture, doors, and occasional accent projects. Choose airless if you have walls, fences, or siding square footage that would take multiple weekend roller marathons. If you are unsure, rent airless once before buying; keep a handheld HVLP if detail work is your real pain point.
FAQ: DIY Paint Sprayers
Do I have to thin all paints?
Not always—especially with airless—but many HVLP jobs need conditioning. Read both the paint and sprayer instructions. Test spray and adjust.
Can I spray without masking everything?
No. Mist is the point of spraying. Mask more than you think, then add a little more.
Will a sprayer replace my brushes and rollers?
No. You will still cut in awkward corners, fix holidays, and roll touch-ups. Sprayers are part of a kit.
How loud and messy is airless?
Louder and messier than a roller, with more cleanup. The trade is speed on large areas.
Next Steps
Match sprayer type to your actual project list, then invest in masking and practice before you aim at finished drywall. Compare the HVLP and airless options above, and keep a roller handy for the jobs spraying should not touch.
Find more painting guidance in our Painting & Wall Prep hub. The right sprayer saves weekends when prep, masking, and cleanup are part of the plan—not afterthoughts.
Extra Practical Notes for Best Paint Sprayers for Home DIY Projects (2026)
Keep a dedicated “paint day” tote with screwdrivers for outlet plates, spare liners, rags, and a mini flashlight for closets. Staging tools reduces trips that track dust back onto wet edges. Photograph the room before you start so you remember furniture spacing and outlet locations when reassembly fatigue hits.
If you share tools across projects, label leftover paint cans with the room name, sheen, brand, and date. Future touch-ups fail when you cannot match a mystery beige from three years ago. Store cans away from freezing garages; frozen latex can ruin film formation even if it looks stir-able.
Finally, schedule buffer time. Rooms almost always need a second look the next morning under different light. A fifteen-minute holiday fix before furniture returns is cheaper than living with a missed spot behind the couch for a year.
Material Compatibility and Sheens
Not every coating loves every sprayer. Thick masonry paints, some textured coatings, and certain elastomeric products may need specialized tips or may be roller-only for DIYers. Cabinet enamels and waterborne alkyds often spray beautifully with HVLP when thinned correctly. Always check technical data sheets for spray recommendations and tip sizes.
Higher sheens show every hesitation mark. If you are spraying semi-gloss doors, practice on scrap until your trigger discipline is automatic.
Power, Hoses, and Workspace Layout
Airless units want stable power and clear hose runs. Keep hoses behind you so you do not spray your own supply line. Stage paint buckets on a protected surface at a height that reduces bending. Indoors, plan an exit path that does not walk through wet mist.
For handheld HVLP, keep the cup seal clean and do not tip aggressively unless the tool is designed for it. Spills inside a motor housing end weekends early.
Filters, Tips, and Spare Parts
Buy spare tips and filters with the sprayer. A clogged tip mid-wall is normal; a missing spare turns normal into a crisis. Learn how to clear clogs safely with pressure relieved. Store tips in a labeled case so sizes do not mix.
Track which tip worked for which paint. Future you will thank present you when the next bedroom uses the same setup.
Environmental Limits
Cold paint sprays poorly. Hot windy exteriors dry mist mid-air and create rough texture. Very humid days slow cure. Ideal spraying is moderate temperature, low wind, and paint conditioned to the temperature range on the can.
Bring paint indoors overnight before cold-weather exterior work so viscosity is predictable.
Learning Curve Expectations
Your first sprayed door may not be furniture-showroom perfect. Budget scrap practice and a closet as a training ground. Watch for runs on vertical edges and sand between coats. By the third project, HVLP technique usually clicks. Airless wall technique clicks faster on open fields but masking skill takes longer than people admit.
If you hate cleanup, spraying may never feel “worth it” regardless of speed. Be honest about that preference before spending.
Storage Between Projects
Flush thoroughly, dry components as directed, and store with protective caps. Mice and dusty garages destroy neglected pumps. Run a maintenance spray of pump conditioner if your manual recommends it for long storage. A $400 tool stored dirty becomes a paperweight.
Seasonal Timing and Indoor Climate
Paint and prep materials behave differently in midwinter dryness versus August humidity. In dry heated homes, paint can set too fast at edges and show lap marks—work in smaller sections and consider an additive designed for your paint brand. In humid weather, extend dry times between compound coats, primer, and finish. A moisture meter is overkill for most walls, but your hand and the clock are not: if compound feels cool and soft, wait.
Open windows when weather allows, but avoid gusts that blow grit onto tacky surfaces. Box fans pointed out a window can help, as long as they do not blast dust from a dirty filter onto wet paint. Turn off ceiling fans while coats are open; swirling air feels nice and creates stipple patterns you did not choose.
Store materials overnight in the same climate as the room. Paint that sat in a freezing car overnight can lose performance even after it seems thawed. Compound stored in a hot shed can dry in the tub. Treat chemistry gently and your finish looks expensive.
Documentation Habits for Future You
Write the date, brand, color name, sheen, and store tint code on the lid and on a piece of tape inside the linen closet. Snap a photo of the wet paint stickers. Future touch-ups and whole-room refreshes become trivial when you are not guessing which “agreeable beige” you used. Keep receipts for specialty primers too—matching a stain-blocking product matters when a leak scar returns.
If you share a home with others, leave a one-page note: which walls were primed, which caulk was used on baths, and which ladder setup worked for the stairwell. The next project starts faster when tribal knowledge is written down.
Mindset: Slow Is Smooth
Most DIY paint frustration comes from rushing the dull steps. Cleaning, sanding, masking, and dry times feel unproductive until you skip them and watch a finish fail. Build deliberate pauses into the plan. Use dry time to clean tools, refill ice water, and inspect with a work light. That rhythm produces better rooms than frantic rolling until midnight.
Measure success by even sheen, clean edges, and durability after a month of living—not by how fast the cans emptied. When neighbors ask who painted, you can say you did—and mean it as a compliment.
Tool Maintenance Between Coats
Wrap brushes and roller covers tightly in plastic wrap or sealable bags if you will resume within a day. For longer breaks, wash latex tools fully until the water runs clear, then reshape brush tips and let covers dry without crushing the nap. A hardened cover cannot be revived into a lint-free applicator. Keep a dedicated bucket and brush comb in your paint kit so cleanup is not improvised in the kitchen sink with a mess left behind.
Inspect extension pole threads and roller frame spring clips before each session. A loose pole that unscrews mid-ceiling pass leaves a commemorative streak. A few drops of light oil on metal threads once a season prevents freezing up in humid storage. Small maintenance habits keep the checklist moving when you would rather be painting than troubleshooting gear.
Light, Sightlines, and Final Judgment
Evaluate finish under the same lights you live with, then add a temporary work light at a sharp angle to catch holidays. Flat afternoon sun through a window can flatter a wall that evening lamps will criticize. Walk the room slowly after each coat. Mark misses with blue tape tabs so you do not lose them when you go mix paint. This inspection habit is faster than living with ghosts behind furniture for years.
If two coats still look uneven, ask whether the cause is porosity, color change, or application. More paint is not always the answer—sometimes another primer spot coat is. Diagnosing before flooding the wall with extra material saves money and drying time.