
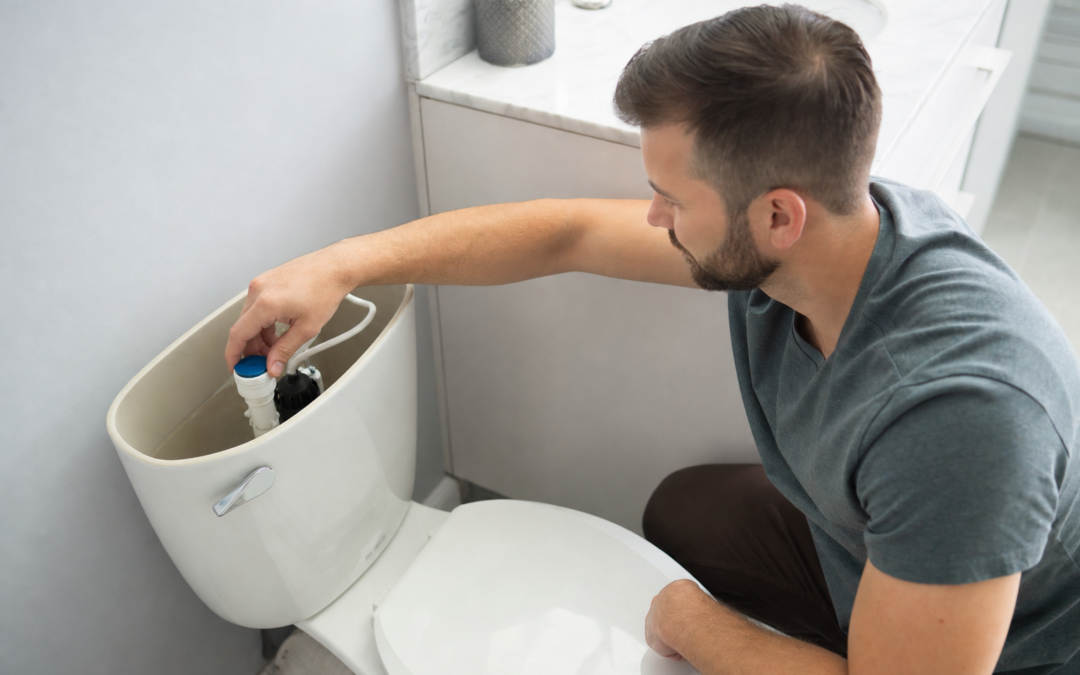
If you’re tired of the constant hiss, trickle, or gurgle coming from your toilet tank after every flush, you’re not alone. Most homeowners have wrestled with noisy or inefficient toilet fill valves and flappers at some point. While these parts are sometimes only thought about when a toilet won’t stop running, they actually play a critical role in how quietly and efficiently your toilet refills—impacting everything from your water bill to your peace of mind.
Choosing the right fill valve and flapper isn’t just about stopping leaks or fixing a running toilet. It’s about upgrading your bathroom’s performance and comfort. In this guide, we’ll go beyond the basic “fix” and dive into how these components work, what features matter for quiet operation, and how to select, install, and maintain them for lasting results.
Why Your Toilet’s Fill Valve and Flapper Matter
The fill valve and flapper are the unsung heroes inside your toilet tank. The fill valve controls how water enters the tank after each flush, while the flapper holds water in the tank until you flush and then lifts to release it. If either part is worn or poorly designed, you’ll notice annoying noises, wasted water, or even a toilet that doesn’t flush properly.
Older homes often have outdated valves and flappers that are prone to leaks and noisy refills. Even in newer homes, the standard parts installed by builders may not be optimized for quiet operation. Upgrading these components is a simple, affordable project that can make your bathroom noticeably more pleasant and efficient.
How Fill Valves and Flappers Work Together
Every time you flush, the flapper lifts and water rushes from the tank into the bowl. Once the water leaves, the fill valve kicks in, refilling the tank until it reaches the correct water level. A good fill valve will shut off cleanly and quietly, while a quality flapper will seal tightly to prevent leaks between flushes. When either component fails, you may hear running water, constant dripping, or a loud “rebound” as the valve closes.
The harmony between these two parts determines not only how quietly your toilet refills, but also how efficiently it uses water. By choosing compatible, high-quality replacements, you can eliminate annoying sounds and save money on your utility bills.
Common Noises: What They Mean
Toilets can make a range of sounds during and after refilling. Here’s what some of the most common noises signal:
- Hissing: Usually means the fill valve is not shutting off properly, or debris is stuck in the valve seat.
- Gurgling or trickling: Can indicate a leaky flapper or a faulty fill valve that allows water to seep constantly into the tank or bowl.
- Loud bang or “water hammer”: Sometimes occurs when the fill valve shuts off abruptly, sending a shockwave through your pipes.
- Continuous running: Typically a sign of a worn or warped flapper that no longer seals tightly.
Addressing these noises often requires a deep dive beyond a quick “jiggle the handle” fix. It means replacing or upgrading the fill valve and flapper for smoother, quieter operation.
What to Look for in a Quiet Fill Valve
Not all fill valves are created equal when it comes to noise reduction. Here are the features that matter most if you want a peaceful bathroom:
- Anti-siphon design: Prevents contaminated water from siphoning back into your supply, and often includes built-in noise dampening.
- Adjustable height: Lets you set the fill valve to match your tank size, optimizing the water flow and refill speed.
- Slow shut-off: Valves that close gradually reduce “water hammer” and abrupt noise as the tank fills.
- Durable materials: Brass and high-quality plastics are less prone to vibration or breakdown over time.
- Easy installation: Look for universal fittings and clear instructions, especially if this is your first DIY plumbing project.

Fluidmaster 400A Brass Shank Universal Toilet Fill Valve Review — An editorial look at this Fluidmaster option for toilet flush valves — specs first, marketing second. Key figures include 019, 2.95 , 0.77 pounds.
Choosing a Flapper for Quiet Performance
While flappers seem simple, their design and material can make a big difference in both noise and efficiency. Here’s what to consider:
- Flexible rubber or silicone: These materials form a tight seal but lift and close quietly, reducing “slap” sounds during flushes.
- Adjustable float or chain: Lets you fine-tune the timing of the flapper’s closure, so you don’t get a harsh “snap” as it seals.
- Resistant to chlorine and hard water: Durable flappers resist breakdown, which can cause leaks and noisy operation over time.
- Compatibility: Make sure your chosen flapper matches your toilet’s flush valve size (most are 2-inch, but some newer models use 3-inch flappers for higher efficiency).
Pairing a new flapper with a modern, quiet fill valve is often the best way to achieve both silence and efficiency in your toilet’s operation.
Installation Tips for Fill Valves and Flappers
Even the best fill valve or flapper won’t perform quietly if it’s installed incorrectly. Here’s how to get it right the first time:
- Turn off the water supply: Always shut off the supply valve before starting work to prevent flooding.
- Empty the tank: Flush your toilet and sponge out any remaining water to avoid a mess.
- Follow instructions: Each product has its own installation steps—read them carefully, especially for adjustments like height or chain length.
- Don’t overtighten: Over-tightening the fill valve or tank bolts can crack porcelain or deform gaskets, leading to leaks and noise.
- Check for leaks: After installation, turn the water back on and check all connections with a dry tissue or paper towel for drips.
If you hear continued noise after installation, double-check that the fill valve float is free to move and that nothing is obstructing the flapper’s seal.
Best Practices for Quietest Toilet Refills
Beyond the right parts, a few habits can help keep your toilet running quietly over the long term:
- Clean the valve seat: Mineral deposits can cause both fill valves and flappers to misalign or leak, leading to noisy operation.
- Adjust water level: Most tanks have a “fill line.” Setting the float so water stops just below the overflow tube reduces refill noise and water waste.
- Replace parts proactively: Don’t wait for a total failure—if you notice increasing noise or minor leaks, swap out worn parts before they become a bigger issue.
- Silence the chain: Make sure the flapper chain isn’t too long (which can get caught under the flapper) or too short (which can hold the flapper open), both of which cause noise.

Oatey Plumber’s Putty White Plumbers Putty 14 oz Review — Practical plumbing from Oatey, summarized from hub features and listed measurements. Key figures include 14 OZ, 31166, 7531166.
Popular Fill Valves and Flappers Worth Considering
The market for fill valves and flappers is packed with options, but a few brands stand out for quiet performance and reliability. Some of the best-reviewed choices include Fluidmaster and Korky for fill valves, and similarly, Korky and Fluidmaster for replacement flappers. These brands offer universal compatibility, simple installation, and proven noise reduction features.
For a deep dive into the most reliable fill valves, you can check out our plumbing hub for detailed reviews and comparisons. Whether you need a universal fit for an older toilet or a part designed for modern water-saving fixtures, you’ll find options tailored to your needs.

KOHLER Brevia Slow Close Elongated Toilet Seat, White Review — Practical toilet seats from Kohler, summarized from hub features and listed measurements. Key figures include 20110, 18 , 4.2 pounds.
Diagnosing Persistent Noise After Replacement
If you’ve replaced your fill valve and flapper and still hear noise, don’t panic. Here’s a quick troubleshooting checklist:
- Is the water pressure too high? Excessively high pressure can cause even the best fill valves to hiss or vibrate. An inexpensive pressure regulator can solve this issue.
- Is the tank lid rattling? Sometimes, noise comes from the porcelain lid moving as water flows. Adding felt pads or repositioning the lid can help.
- Is the supply line vibrating? Flexible supply hoses can resonate when water flows quickly. Securing the line or swapping for a sturdier hose may help.
- Are there air bubbles in the fill tube? A poorly seated refill tube can create gurgling. Make sure the tube is inserted just above the overflow and not submerged.
Addressing these small details can further reduce noise and improve your overall satisfaction with your toilet’s performance.
Water Efficiency and Modern Toilet Components
Modern fill valves and flappers are designed not just for quiet operation, but also for water efficiency. Older toilets can use up to 7 gallons per flush, but new fill valves can help regulate and reduce the amount of water used per cycle. Adjustable flappers let you fine-tune how much water is released with every flush, which is especially helpful if you have a dual-flush or eco-friendly toilet.
Switching to upgraded components can help you comply with local water-saving regulations and reduce your monthly bills—all while keeping your bathroom quiet. If you’re upgrading, make sure to choose fill valves and flappers rated for low-flow toilets if your fixture is 1.6 gallons per flush or less.
DIY vs. Professional Installation: What to Know
Most homeowners can replace a fill valve or flapper in under an hour with simple hand tools. However, if your toilet is older, or if you discover corroded bolts, stuck parts, or an unusual tank design, you may need professional help. Here are some guidelines for when to call a plumber:
- You can’t shut off the water supply at the wall.
- The tank bolts are rusted or won’t budge.
- You notice cracks in the tank or bowl.
- You’re not comfortable working with plumbing fixtures.
For most installations, though, following the included instructions and using a little patience will result in a quieter, more efficient toilet.
Long-Term Care for Fill Valves and Flappers
To get the most from your quiet fill valve and flapper, a little occasional maintenance goes a long way:
- Inspect annually: Look for signs of wear, mineral buildup, or leaks at all connections.
- Clean flapper and valve seat: Use a soft brush and vinegar to gently remove hard water deposits every 6-12 months.
- Replace as needed: Even high-quality rubber and plastic parts degrade over time—expect to replace flappers every 3-5 years and fill valves as needed.
- Monitor water usage: If your water bill suddenly spikes, check your toilet tank first—small leaks can waste hundreds of gallons monthly.
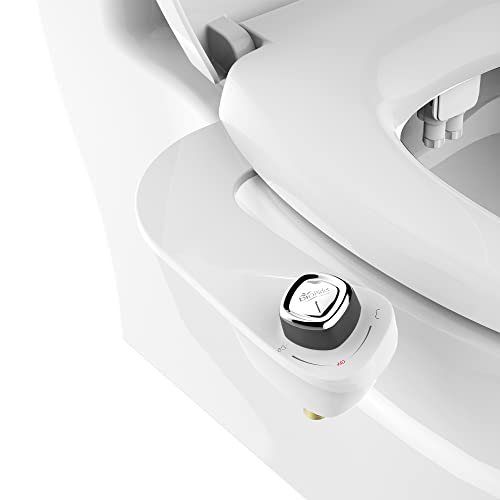
Bio Bidet SlimEdge Bidet Attachment for Toilet Review — A Bio Bidet pick in Bidet Attachments that focuses on real-world usability Key figures include 1 Pack, 7.2 , 1 pounds.
Frequently Asked Questions About Quiet Fill Valves and Flappers
- Can I use any fill valve or flapper in my toilet? Most modern fill valves and flappers are designed for universal fit, but always check your tank dimensions and flush valve size before purchasing.
- How can I test for a leaky flapper? Put a few drops of food coloring in your tank—if the color appears in the bowl after 15 minutes without flushing, your flapper is leaking.
- Are “adjustable” fill valves worth it? Yes—being able to set the height and flow rate helps you optimize both noise and efficiency for your specific toilet model.
- What’s the average cost to replace a fill valve and flapper? Most quality kits cost between $10 and $30, with professional installation adding $50-$100 if needed.
- Will a quiet fill valve slow down my toilet’s refill time? Not usually—modern quiet valves are engineered to fill efficiently without the noise of older models.
Final Thoughts: Investing in a Quieter, More Efficient Toilet
Upgrading your toilet’s fill valve and flapper is one of the simplest, most cost-effective ways to improve both comfort and efficiency in your bathroom. With the right components, you’ll enjoy peaceful refills, fewer leaks, and lower water bills—all without complicated plumbing work.
Whether you’re tackling a running toilet, looking to reduce noise, or simply want a smarter, more modern bathroom, investing in quality replacement parts pays off. For more in-depth plumbing guides, tips, and product reviews, visit our plumbing resources hub at Big Home Improvements.
Toilet Fill Valve and Flapper Maintenance Tips
Regular maintenance of your toilet’s fill valve and flapper is essential for quiet, efficient operation and to extend the lifespan of these components. Here are some practical tips to keep your toilet running smoothly:
- Inspect for leaks: Check around the base of the fill valve and the seal of the flapper for any signs of water leakage. Even a slow leak can waste gallons of water over time.
- Clean mineral deposits: Hard water can cause mineral buildup on both valves and flappers. Use a gentle brush and vinegar to remove deposits and keep moving parts working freely.
- Test the flapper seal: Add a few drops of food coloring to the tank. If the color appears in the bowl within 30 minutes without flushing, your flapper isn’t sealing properly and may need replacement.
- Check for proper alignment: Ensure the fill valve is upright and the float moves freely. The flapper chain should have a slight slack but not be so long that it gets tangled.
- Replace worn parts promptly: If you notice any warping, cracking, or deterioration, swap out your fill valve or flapper. Most modern replacements are designed for easy DIY installation.
By making these checks part of your seasonal home maintenance routine, you’ll avoid most common toilet noises and water waste issues before they start.
Checklist: Installing a New Toilet Fill Valve and Flapper
Ready to upgrade your toilet’s fill valve and flapper? Use this checklist to ensure smooth installation and optimal results:
- Turn off the water supply at the shutoff valve.
- Flush the toilet and hold down the handle to drain as much water as possible from the tank.
- Sponge out any remaining water from the tank bottom.
- Disconnect the supply line from the tank (have a towel handy for drips).
- Remove the old fill valve and flapper, noting how each is installed.
- Clean the tank interior, especially around the mounting holes and flapper seat.
- Install the new fill valve, adjusting the height to match your tank’s requirements.
- Secure the fill valve and reconnect the supply line. Hand-tighten connections to avoid cracking plastic parts.
- Attach the new flapper to the flush valve. Adjust the chain so there is just enough slack for the flapper to close fully.
- Turn on the water supply slowly and allow the tank to fill.
- Test flush several times, checking for leaks and listening for any unusual sounds.
- Make final adjustments to the float level and flapper chain as needed for quiet, efficient operation.
Following these steps will help ensure your new parts deliver the quiet performance you expect.
Common Mistakes When Replacing Fill Valves and Flappers
Swapping out a fill valve or flapper is a straightforward project, but a few common mistakes can undermine your results. Here’s what to watch out for:
- Over-tightening fittings: Cranking down too hard on plastic nuts or supply lines can crack components or strip threads, leading to leaks.
- Incorrect fill valve height: If the fill valve is set too high or low, the tank may overfill or not fill enough, causing poor flushes or noisy operation.
- Wrong flapper type: Not all flappers fit all toilets—using the wrong size or style can cause constant running or weak flushes.
- Improper chain length: If the flapper chain is too tight, it may prevent the flapper from sealing. If too loose, it can get caught under the flapper.
- Ignoring small leaks: Even a minor drip can indicate a poorly installed or defective part. Always test thoroughly after installation.
Avoiding these pitfalls will help ensure your toilet operates quietly and efficiently after your upgrade.
FAQs About Toilet Fill Valves and Flappers
How often should I replace my toilet fill valve and flapper?
Most fill valves and flappers last 4–5 years, but hard water, high chlorine levels, or frequent use can shorten their lifespan. If you notice persistent noises, leaks, or running water, it’s time to inspect and possibly replace these parts.
Will a new fill valve and flapper reduce my water bill?
Yes, a properly functioning fill valve and flapper prevent constant running and leaks, which can waste hundreds of gallons per month. Upgrading to newer, more efficient models can result in noticeable savings on your water bill.
Can I install a fill valve and flapper myself?
Most homeowners can handle this project with basic tools and a little patience. Manufacturers provide step-by-step instructions, and universal kits are designed for easy DIY installation. If you encounter corroded parts or unusual plumbing, consider calling a professional.
Why does my toilet make noise even after replacing the fill valve and flapper?
Other issues—such as high water pressure, loose supply lines, or worn tank-to-bowl gaskets—can also cause noise. If new parts don’t solve the problem, inspect these areas or consult a plumber.
How do I know if my flapper is the right size?
Most toilets use either a 2-inch or 3-inch flapper. Measure the flush valve opening or bring the old flapper to the hardware store for comparison. Using the correct size is critical for a proper seal and quiet operation.
Are there universal fill valves and flappers?
Many modern fill valves and flappers are “universal” and fit most standard toilets. However, some high-efficiency or specialty toilets may require specific parts. Check your toilet’s make and model before purchasing replacements.
How to Troubleshoot Persistent Toilet Noise
If you’ve replaced your fill valve and flapper but still hear noises, try these troubleshooting steps:
- Check water pressure: High pressure can cause noisy refills. Install a pressure-reducing valve if your home’s pressure is above 80 psi.
- Secure supply lines: Vibrating or loosely mounted supply lines can transmit noise. Ensure all connections are tight and use flexible hoses with built-in dampeners if possible.
- Inspect the overflow tube: Water running into the overflow tube may mean the fill valve needs adjustment.
- Listen for internal tank issues: Sometimes, debris or a misaligned float can cause odd sounds. Clean and realign as needed.
Persistent noise after replacing core parts may indicate a larger plumbing issue. Don’t hesitate to call a professional if you’re unable to resolve the problem.
Our content is researched and drafted with AI assistance and reviewed by our team. Product details come from published specs, manufacturer information and owner reviews.